|
If you're sick and tired of
scrounging for the right nail, screw, nut, bolt or whatever, you'll
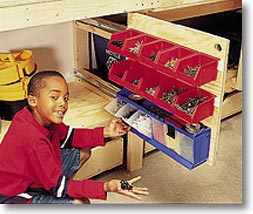
love the slide-out drawer panel. Adding this panel is as easy as
toenailing in a couple of backer boards and fastening a pair of
22-in. drawer slides ($15 per pair) to a piece of plywood. You can
mount just about any store-bought plastic storage or homemade
plywood storage bins right on the surface of the plywood. Mount them
to any bench leg for even more hardware storage. Their under-bench
location will keep the containers from filling with sawdust.

|

|


|
|

| |
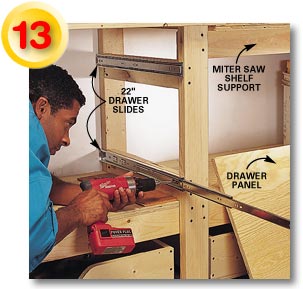
TOENAIL
a block to the
top of the shelf and to the bottom of the rear rail of the
bench in line with the front leg. Screw in two level support
blocks against the bottom shelf plywood and 3-1/2 in. from the
bottom of the workbench. Screw the fixed part of the drawer
slides even with the tops of these blocks and even with the
front of the bench leg.
|

|
|

| |
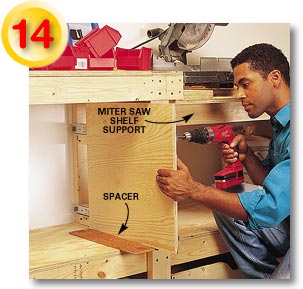
REST a 1/4-in. to 3/8-in. spacer directly under
the drawer panel. Pull the drawer panel out about 3 in. and
slide out the drawer slides until they're even with the edge
of the panel. Screw the first screws of the upper and lower
slides into the back of the panel. Pull out the panel until
the next two screw holes are visible and fasten those. Pull
out the panel the rest of the way and install the last set of
screws.
|

|
|

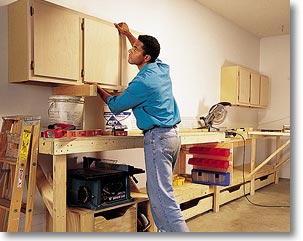
Any wall cabinets (have any of your friends
remodeled their kitchen lately?) will work for overhead storage, but
we chose to buy 54-in. wide by 30-in. tall utility cabinets ($40
apiece) at our local home center. Inside, we wired an outlet to give
the battery-powered tools their own sawdust-free home and recharging
station. In another cabinet we cut a 5-in. hole in the side for a
convenient rag dispenser.
|
|

|

